
Neutral Density (ND) graduated filters and alternatives


One of the most popular and useful filters for the landscape photographer is the graduated neutral density filter. These come in varying strengths. Their purpose is to even out exposure values in the sky and the land.

Technically perfect use will render sky and land at the correct values mimicking what we see with our eyes. A more artistic interpretation, much favoured by landscape photographers, is to darken the sky even more, creating a sense of drama.

The same effect can be achieved by taking two exposures of the same scene, using a tripod to keep everything in the same place and then overlapping the images. Digital capture and editing have made this option easy and convenient. The technical side of how to do this is elaborated on below.

But first let's look at the pros and cons of both methods.

The pros for ND grads are:
> you get the exposure right in a single shot which saves space on your memory card
> if anything is moving across the frame then it will register correctly whereas a double exposure will leave you with problems in the overlapping areas
> you don't need a tripod, which means you can work faster

The pros for multiple exposures in RAW are:
> you get the full benefit of the quality of the lens with no filter in front
> more control over the end result
> very precise control over the amount of graduation and exactly where it falls
> no messing about with lining the filter up
> no problems with vignetting on super-wide angle lenses

Now here's a good tip. One of the 'mistakes' that photographers make when using the combined RAW files method is that they try to divide the two different exposures between the sky and land using precise selections in Photoshop. They then complain that it does not look natural and not as good as when using a ND Grad. Of course they're missing the all important graduated transition part from the equation.

The way I work it is to mimick the effect of an ND Grad by applying a transparent graduated filter in Photoshop across the top of the second exposure's layer mask. This, to my eye looks far more natural and allows precise control over the transition area.

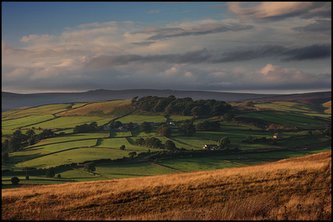
Try and guess how my shot of Yorkshire above was created. Ultimatley it doesn't matter how you get there so long as the end print is stunning. I use both methods. My favourite is probably the Photoshop route but it all depends on the subject.

Cheers,
Paul Posted by Picasa

Comments

Anonymous said…
Hi Paul, thanks for this clear explanations (my use of my ND filter has been a hit and miss so far).

Marleen
Beyond the obvious said…
Hi Marleen, I'm delighted that you found my explanation useful.
All the best,
Paul
Anonymous said…
I hear rumours in certain camera clubs you can be burned at the stake for using the photoshop method but I'd have to confess to using both methods myself.

Popular posts from this blog

Beyond the Obvious: Lessons from the Masters of Photography

  In photography, there’s more than technical skill or gear; the real art is in connection, storytelling, and moments that matter. In this blog, I’ll explore what I have learned by taking master classes with photographers like Steve McCurry, Joel Meyerowitz, and Albert Watson. One of the surprising outcomes of learning from them was discovering just how closely my  thoughts and practice aligned with theirs although I've always carved my own path. There is something delightful about finding kindred spirits. I wanted to share what I've learnt and remind us of our true practice as photographers behind the lens. Storytelling Through Human Connection A photograph should convey more than just skill—it should capture a story that resonates. Steve McCurry’s iconic Afghan Girl does this beautifully, capturing strength and vulnerability in a single frame. Like McCurry, I believe photography should reveal the depth and uniqueness of our subjects. This requires empathy, patience, and a ...

Curiosity

 Photography is more than just capturing moments; it's about telling stories, evoking emotions, and portraying the world through the lens's perspective. At the heart of our creative endeavour lies an essential trait: curiosity. This picture shows a man peering through a window cut in the wall of a hoarding around a construction site. He was fascinated by the activity, and I was fascinated by his curious gaze. Curiosity fuels the photographer's journey, propelling us to explore the world with fresh eyes and an insatiable appetite for discovery. Creativity:  Curiosity is the cornerstone of creativity. It compels photographers to push boundaries, experiment with new techniques, and step out of their comfort zones. Photographers can unlock their creative potential and produce remarkable work by embracing curiosity. Storytelling:  Every photograph has a story to tell, and curiosity is the key to uncovering these narratives. Whether delving into a location's history, connecti...

The Story Behind the Stories in My Photography

 Thank you for taking the time to explore my work. Photography, to me, is a meditative act—an opportunity to be fully present and notice the smallest details. The interplay of colour and light, the textures and shapes, the shift of an expression, a gesture — these subtle moments bring me pure joy. They are why I love storytelling and creating visual poetry. Every image in my portfolio is born from a moment of connection or curiosity. Whether I’m in a bustling city street, a quiet room, or a remote location, I aim to create photographs that resonate with empathy. Take "The Cyclists," for example—what appears to be a simple scene of people pedalling along the pier transforms into a visual symphony of movement and stillness, the hurried energy balanced by the serene focus of the riders. This interplay between action and calm often draws me in. I’m drawn to capturing the essence of a person—their inner world, not just their outward appearance. My approach often dances between the...